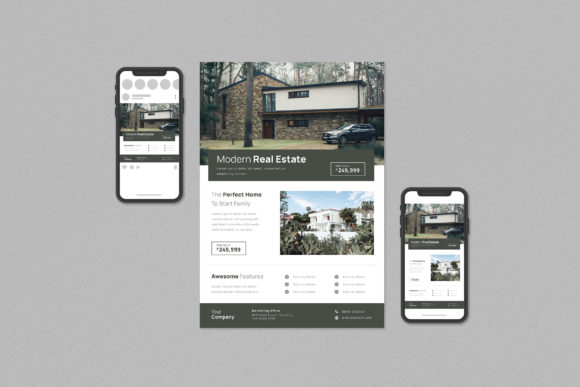
Master Your Marketing with the Right Real Estate Flyer Set
In the competitive world of property sales, first impressions are everything. A well-designed flyer can be the difference between a listing that gets ignored and one that generates a flood of inquiries. For agents and agencies looking to maintain a professional image without spending a fortune on a designer for every new property, a Real Estate Flyer Set is an invaluable tool. This collection of templates is designed to streamline your marketing workflow, providing a cohesive and polished look for both print and digital platforms. However, simply purchasing a template pack is not a guarantee of success. Many users make critical errors that lead to wasted time, poor print quality, and a final product that looks amateurish.
This guide will walk you through the common pitfalls of using real estate templates and show you how to leverage a professional set to its full potential, ensuring your marketing materials always reflect the quality of your service.
Understanding What You're Getting: More Than Just a Pretty Picture
Before diving into customization, it is crucial to understand the components of a professional template pack. A high-quality Real Estate Flyer Set is not just a single JPEG image you can edit in a basic program. It is a sophisticated file structure built for professional software like Adobe Illustrator (Ai) and Adobe Photoshop (PSD). The product description often includes specific details that are vital for your success.
For instance, you will see specifications like Ai Compatible files for Adobe Illustrator CC and PSD Compatible files for Adobe Photoshop CS4, CS5, CS6. This is the first checkpoint. If you do not own or know how to use these programs, the templates will be unusable to you. They are designed for users who need granular control over every element.
Furthermore, the features list contains critical information that directly impacts your workflow and the final quality of your flyer:
- Fully customizable and editable Ai PSD templates with bleed. The "bleed" is the area that extends beyond the final cut line of your printed document. Forgetting to include or extend your design into the bleed area is a classic beginner mistake that results in ugly white edges on your professionally printed flyers.
- Texts, images, and graphics are on separate layers. This is a hallmark of a well-organized file. It allows you to easily select and change a headline, swap out a photo, or move a graphic without accidentally affecting other elements. A poorly made template with everything on one layer is a nightmare to edit.
- CMYK 300 DPI – Print-ready. This is non-negotiable for any physical print job. CMYK is the color mode used by professional printers, while RGB is for screens. Sending an RGB file to a printer will result in colors that look dull and inaccurate. A resolution of 300 DPI (Dots Per Inch) ensures your images and text are sharp and clear. Using a 72 DPI web-optimized file for print will make your flyer look pixelated and blurry.
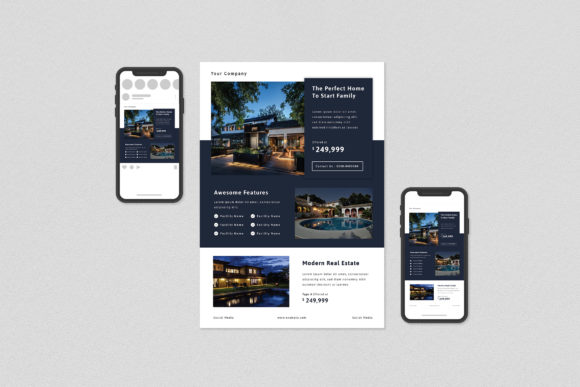
- Artboard size A4 & Instagram formats. A professional set provides multiple sizes for different platforms. Using an A4 print layout for an Instagram post is a fundamental error. The aspect ratio will be wrong, forcing you to crop out important information or have awkward empty spaces. A good set includes correctly sized templates for Instagram Post (1080×1080) and Instagram Story (1080×1920), which are in RGB 72 DPI for optimal screen viewing.
The Most Common Mistakes and How to Avoid Them
Even with a great template set, the final product depends on how you use it. Here are some of the most frequent errors people make and the better approaches to take.
Mistake 1: Ignoring the File Organization
Many users download the files, open the PSD or Ai file, and immediately start trying to change the text. They get frustrated when they can't select a specific element. The problem? They didn't look at the Layers Panel. A well-organized template will have clearly labeled layers for "Headline," "Body Text," "Property Photo," "Agent Headshot," "Logo," and "Background Graphics."
The Better Approach: Before you change a single thing, spend two minutes examining the layers panel. Collapse and expand layer groups to understand the structure. This small investment of time will make the entire customization process faster and smoother. You will be able to turn elements on and off, lock layers you don't want to move, and easily select the exact component you need to edit.
Mistake 2: Using Low-Quality Photography
A template is only a frame for your content. A common and damaging mistake is using blurry, poorly lit, or low-resolution property photos. The template description clearly states, "Photography images are not included." This is because the quality of your listing photos is your responsibility. Placing a 500-pixel-wide web image into a 300 DPI print layout will make it look terrible.
The Better Approach: Always use the highest-resolution photos you have. For print, the image should be at least 300 DPI at the size it will be printed. If you are taking photos yourself, use a tripod and good lighting. If you are using photos from a professional photographer, ensure you have the full-resolution files. A stunning template cannot fix a bad photo.
Mistake 3: Font Chaos and Licensing Issues
The template notes that "Free fonts used [are] not included, download links provided." A major oversight is either forgetting to download these fonts or, worse, substituting them with a mismatched font from your own computer. This breaks the design's visual harmony. Another subtle mistake is using a "free" font for a commercial purpose without checking its license. While the template links to free fonts, it's always wise to verify the license allows for commercial use (like marketing materials).
The Better Approach: Follow the provided links and install the exact fonts specified. This ensures your flyer looks exactly like the preview. If you must substitute a font, choose one with a similar style and weight (e.g., replace a modern sans-serif with another modern sans-serif, not a script font). Always double-check font licenses for commercial projects to avoid legal issues down the line.
Choosing the Right Template for Your Brand
Not all flyer sets are created equal. When evaluating a Real Estate Flyer Set, look beyond the initial aesthetic appeal. Consider how well it aligns with your personal or brokerage brand.
Ask yourself these questions before you buy:
- Is the style versatile? Does the set include templates that can work for luxury condos, family homes, and modern apartments? A set with only one design style will limit you.
- Are the layouts logical? Is there a clear hierarchy of information? A good flyer guides the reader's eye from the headline to the best photo, key details, and finally, your contact information. A cluttered or confusing layout will lose the reader's attention.
- Does it include digital and print formats? In today's market, you need more than just an A4 print flyer. The inclusion of Instagram Post and Instagram Story templates is a huge advantage, allowing you to maintain brand consistency across all your marketing channels.
By investing in a comprehensive and thoughtfully designed Real Estate Flyer Set and learning how to use it correctly, you equip yourself with a powerful marketing asset. You move from simply listing a property to professionally presenting it, building your brand's credibility, and ultimately, closing more deals. Avoid the common mistakes, pay attention to the technical details, and you will find that this tool saves you time, money, and a great deal of frustration.